UEVR
Welcome to UEVR! This powerful tool will transform your favorite Unreal Engine games into 6DOF VR experiences with minimal effort.
UEVR can be downloaded from here.
Supported Engine Versions
- Unreal Engine 4.8 - 5.4
Supported Graphics APIs
- Direct3D 11
- Direct3D 12
Features
- Full 6DOF support out of the box (HMD movement)
- Full stereoscopic 3D out of the box
- Frontend GUI for easy process injection
- Supports OpenVR and OpenXR runtimes
- Native UE4/UE5 stereo rendering system for a truly immersive VR experience
- 3 rendering modes: Native Stereo, Synchronized Sequential, and Alternating/AFR
- Optional 3DOF motion controls in many games, essentially emulating a semi-native VR experience
- Optional roomscale movement in many games, moving the player character itself in 3D space along with the headset
- User-authored UI-based system for adding motion controls and first person to games that don't support them
- Automatic handling of most in-game UI so it is projected into 3D space
- In-game menu with shortcuts for adjusting settings
- Access to various CVars for fixing broken shaders/effects
- Optional depth buffer integration for improved latency on some headsets
- Per-game configurations
- C++ Plugin system and Blueprint support for modders to add additional features like motion controls
Reporting a bug
Click "Open Global Dir" in the frontend. Browse to the corresponding game folder that is having an issue and zip up the folder and upload it for us. Clicking "Export Config" is an alternative here to do this automatically.
You can then describe the issue and upload the file for us on the Issues.
You can read the full instructions when making an issue, choose the bug report template.
Getting Started
Before launching, ensure you have installed .NET 6.0. It should tell you where to install it upon first open, but if not, you can download it from here
Anti-viruses may delete files required to run from UEVR at this time. You may need to whitelist the UEVR directory and un-quarantine any files the anti-virus may have deleted.
- Launch UEVRInjector.exe
- Launch the target game
- Locate the game in the process dropdown list
- Select your desired runtime (OpenVR/OpenXR)
- Configure pre-injection settings
- Inject
To-dos before injection
Double check that the game you are injecting into has no Anti-Cheat mechanisms. If you are not sure, assume that all multiplayer games have Anti-Cheat, and do not attempt to inject into them. The exception here is if it can be disabled in some way to play offline.
- Disable HDR (it will still work without it, but the game will be darker than usual if it is)
- Start as administrator if the game is not visible in the list
- Pass
-nohmdto the game's command line and/or delete VR plugins from the game directory if the game contains any existing VR plugins - Disable any overlays that may conflict and cause crashes (Rivatuner, ASUS software, Razer software, Overwolf, etc...)
- Disable graphical options in-game that may cause crashes or severe issues like DLSS Frame Generation
- Consider disabling
Hardware Accelerated GPU Schedulingin your WindowsGraphics settings
Quick troubleshooting
There are some games that work pretty much perfectly out of the box, and others will need tinkering.
- If there are major graphical bugs or crashing, change the rendering method to Synced Sequential and check if the issue goes away
- If there is still crashing, there are various Compatibility options that can be enabled (Advanced View shows them, or can be seen in the frontend)
- Do not enable Extreme Compatibility Mode, only as a last resort
- If there are still graphical bugs present, enable Advanced View and tweak the CVars
- INI tweaks can work here as well
- If the game is locked to 60 FPS (even in flat), disable ASW/motion smoothing so the game doesn't slow down due to the runtime halving the framerate
- If the game is running poorly, lower the in-game settings, lower the resolution in the UEVR interface or SteamVR
- If there is rapid flickering or extreme lag, this likely indicates that DLSS Frame Generation is enabled, turn it off or disable
Hardware Accelerated GPU Schedulingin your WindowsGraphics settings. - OpenXR Toolkit may also need to be disabled if there is even more crashing or lag
If all fails, someone may have came up with a config for the game or can help you on the Flat2VR Discord.
If there is rotational judder/lag
There's a few reasons for this and fixes for it:
- If using Virtual Desktop, you must use OpenXR to prevent lag when rotating your head, OpenVR simply does not work correctly right now with Virtual Desktop
- The
Virtual Desktop fixmust be enabled if it isn't getting enabled (under Runtime)
- The
- You can also disable
r.OneFrameThreadLagunderConsole/CVars(advanced view must be enabled) - You can also modify the
Frame Delay Compensationunder Debug (advanced view must be enabled)
In-Game Menu
Press the Insert key or L3+R3 on a controller to access the in-game menu, which opens by default at startup. With the menu open, hold RT for various shortcuts:
- RT + Left Stick: Move the camera left/right/forward/back
- RT + Right Stick: Move the camera up/down
- RT + B: Reset camera offset
- RT + Y: Recenter view
- RT + X: Reset standing origin
Help! What games are Unreal Engine?
Use tools like Rai Pal.
Rai Pal is a tool by Raicuparta that can go through your entire library of games and attempt to tell you what engine, and what version of that engine they are using.
It also has some level of support for UEVR for automatic launching, as well as displaying user scores given to the VR compatibility of a given game.
Alex also has made a spreadsheet of supported games and how well they function, and various other metrics.
Quick overview of rendering methods
Native Stereo
When it works, it looks the best, performs the best (usually). Can cause crashes or graphical bugs if the game does not play well with it.
Temporal effects like TAA are fully intact. DLSS/FSR2 usually work completely fine with no ghosting in this mode.
Fully synchronized eye rendering. Works with the majority of games. Uses the actual stereo rendering pipeline in the Unreal Engine to achieve a stereoscopic image.
Synchronized Sequential
This is the first alternative option that should be used if Native Stereo is not working as expected or you are encountering graphical bugs. It should be noted that this mode gives worse performance than Native Stereo.
A form of AFR. Can fix many rendering bugs that are introduced with Native Stereo. Renders two frames sequentially in a synchronized fashion on the same engine tick.
Fully synchronized eye rendering. Game world does not advance time between frames.
Looks normal but temporal effects like TAA will have ghosting/doubling effect. Motion blur will need to be turned off.
Skip Draw skips the viewport draw on the next engine tick. Usually works the best but sometimes particle effects may not play at the correct speed.
Skip Tick skips the next engine tick entirely. Usually buggy but does fix particle effects and sometimes brings higher performance.
AFR
Alternated Frame Rendering. Renders each eye on separate frames in an alternating fashion, with the game world advancing time in between frames. Causes eye desyncs and usually nausea along with it.
Not synchronized. Generally should not be used unless the other two are unusable in some way.
Overview of UEVR usage by Alex
Getting started spreadsheet by Alex
Additional information
Read the Detailed overview for a comprehensive guide on how to fine-tune your VR experience.
Head over to the Flat2VR Discord.
Special thanks
- TheNewJavaman - Developer of the previous Unreal VR project.
To all the testers. These include:
-
Brian Tate - Founder of the Flat2VR community. He is the catalyst that kicked off this project. He was digging around and found out that most of the stereo pipeline is left in the engine.
-
Alex G/Virtual Insider - A tester from the start. Has helped find many bugs and issues. Has also provided many helpful suggestions and ideas.
-
Alex/Waifu Enjoyer - One of the most prolific testers. Has tested hundreds of games and has helped find many bugs and issues. Has also provided many helpful suggestions and ideas. Has provided helpful statistics on game compatibility.
-
Alchemist - DRG VR developer.
-
Ashok - Has helped find many bugs and issues. Has also provided many helpful suggestions and ideas. Has poked around various specific games making mods to fix issues with them and add things like Oculus controller prompts. Experimented a lot with UObjectHook to fix games and find issues/pain points with this feature.
-
Igoreso
-
Jay Fullerton - Has tested many games, and stands out as one of the testers with a lower end system. This has helped get an idea of how the tool performs on lower end hardware.
-
Kitt - Mechwarrior 5 VR developer.
-
Lance McCary - Has helped find many bugs and issues. Has also provided many helpful suggestions and ideas. Helped coordinate with Matthieu Bucchianeri to get eye tracked foveated rendering working in OpenXR Toolkit.
-
Kalth Streil - Has helped find many bugs and issues.
-
Matthieu Bucchianeri - Creator of OpenXR Toolkit. Has helped figure out what needed to be changed to get eye tracked foveated rendering working. Has also provided many helpful technical insights into the OpenXR API and VR development in general.
-
Narknon - UE4SS developer. Provided a lot of helpful information about the Unreal Engine in general.
-
PanterA - Joined late into development, but tested a good amount of games and provided good feedback. Located games that were causing crashes after code changes. Helped find issues with AMD GPUs.
-
PinkMilkProductions - DRG VR developer.
-
pvncher
Disclaimer
UEVR is not affiliated with, endorsed by, or connected to Epic Games, Unreal Engine, or any of their affiliates. All trademarks are the property of their respective owners.
UEVR: In-Depth Guide
Dive deeper into the UEVR and learn how to fine-tune your VR experience with this comprehensive guide. We'll explore various settings, configurations, and troubleshooting tips to help you get the most out of your favorite Unreal Engine games in VR.
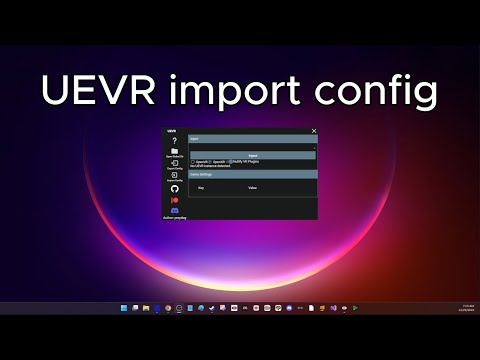
Frontend GUI
The frontend GUI provides an intuitive interface for injecting VR functionality into your chosen game. Here, you can:
- Select a process to inject into
- Choose your desired runtime (OpenVR/OpenXR)
- Toggle VR plugins (if necessary)
- Configure pre-injection settings
OpenVR or OpenXR?
OpenVR usually has the highest compatibility, but OpenXR usually gives higher performance when it works, especially if the headset has a native OpenXR runtime.
OpenVR requires SteamVR to be installed. OpenXR requires a valid OpenXR runtime for the headset, but can also run through SteamVR if SteamVR is set as the active runtime.
When using Virtual Desktop, you must use OpenXR to avoid rotation lag when moving your head.
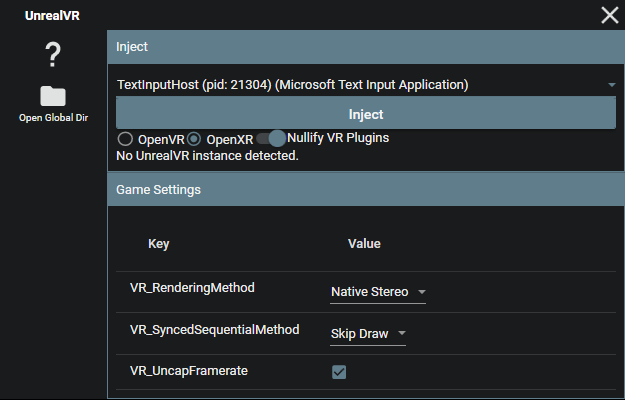
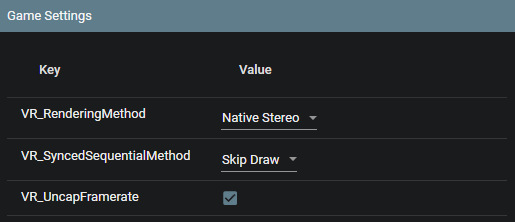
Pre-Injection Settings
Before injecting, you can customize the following settings:
VR_RenderingMethod: Choose from Native Stereo, Synchronized Sequential, or Alternating/AFRVR_SyncedSequentialMethod: Configure the behavior of the Synced Sequential rendering methodVR_UncapFramerate: Enable or disable framerate uncapping
After injection, the rest of the options will populate automatically. You can modify these settings in the in-game menu or through the config.txt file.
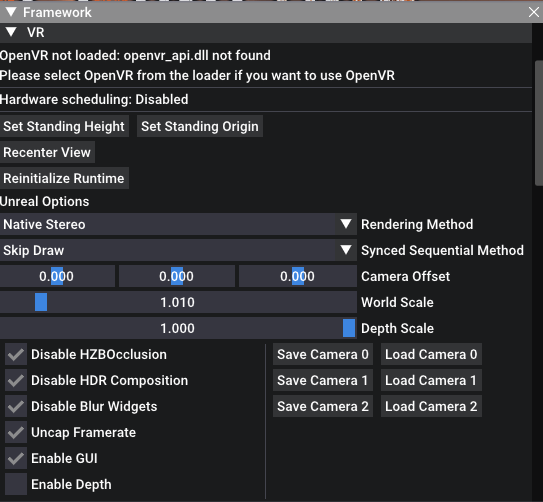
In-Game Menu
The in-game menu offers additional configuration options and shortcuts for adjusting settings on the fly. Access the menu by pressing the Insert key or L3+R3 on a controller.
The in-game menu can be accessed either inside the VR headset, or you can use the desktop view to adjust settings without having to put on a headset.
As of recent updates, the menu can be controlled as well by pointing your motion controller at it to emulate a mouse.

In-Game Shortcuts
While holding RT:
- RT + Left Stick: Move the camera left/right/forward/back
- RT + Right Stick: Move the camera up/down
- RT + B: Reset camera offset
- RT + Y: Recenter view
- RT + X: Reset standing origin
CVars and Fixes
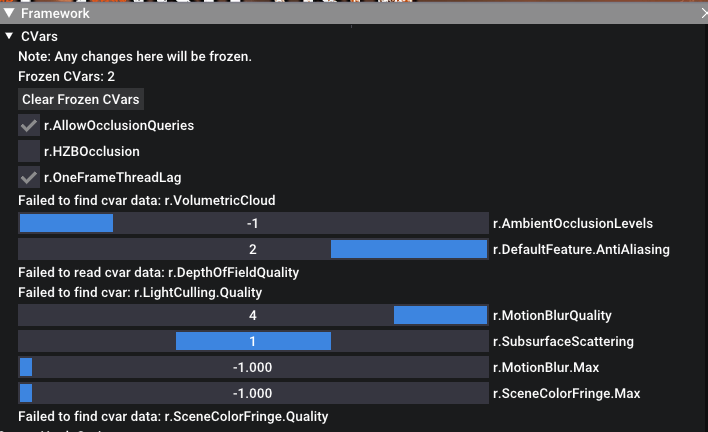
Use the in-game menu to access and modify various CVars for fixing broken shaders and effects. The tool offers a range of options for addressing common rendering issues.
Depth Buffer Integration
While depth buffer integration is disabled by default, enabling it can greatly improve latency on Oculus headsets when using OpenXR with the native Oculus OpenXR runtime. To enable depth buffer integration, adjust the VR_EnableDepth setting.

Configurations
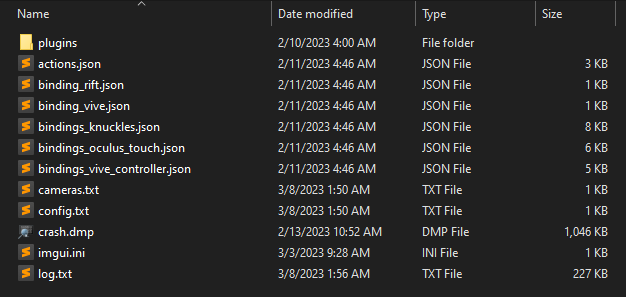
All configurations are stored on a per-game basis in the %APPDATA%/UnrealVRMod directory. You can modify settings directly in the UI or through the config.txt file. This directory can be accessed in the frontend GUI by clicking the "Open Global Dir" button.
Console commands
Configurations can have console commands that are executed at startup within the user_script.txt file. It must be created manually.
Example user_script.txt file:
stat fps
r.DefaultFeature.AntiAliasing 0
Plugins
Plugins can be installed in the plugins folder in the game's configuration directory. Simply drop the plugin dll into it.
Troubleshooting & Optimization
Optimal performance and compatibility
- Tweak graphical settings in-game to reduce load
- Experiment with different rendering methods if you encounter rendering bugs or crashes
- Use the in-game menu and CVars to address shader and effect issues
- Enable depth buffer integration for improved latency on Oculus headsets (OpenXR only)
- Consider upgrading your system for the best experience with high-end AAA titles
Further tweaks can be done by modifying the game's INI files, using UUU, UE4SS, or other external tools. Various tweaks that have been made for the normal version of the games can be applied to the VR version as well.
For those with motion sickness
Enable "Decoupled Pitch" under the VR options. This will stop the camera from rolling or moving vertically.
UEVR: Default VR Controller Bindings
UEVR implements (or attempts to implement) 1:1 mappings from a default Xbox controller to a VR controller.
These can be rebound in a few ways:
- If using OpenXR, you can modify the bindings under Runtime
- If using SteamVR/OpenVR, they can be remapped like a normal VR game
- If using Steam with any runtime, Steam Input can be used to remap the buttons as well
Default Bindings
-
Left thumbstick: Move
-
Right thumbstick: Rotate
-
Left Grip: LB
-
Right Grip: RB
-
Left Trigger: LT
-
Right Trigger: RT
-
Left Thumbstick Click: L3
-
Right Thumbstick Click: R3
-
Left System Button: Start/Pause
-
Left A Button: B/Circle
-
Left B Button: Y/Triangle
-
Right A Button: A/X
-
Right B Button: X/Square
Special Default Bindings
- Left System Button (Long Press): Select/View
Oculus Special Bindings
- Right Thumbrest + Left thumbstick: DPad
- This can be disabled if you want to use the thumbrest for something else or the thumbrest has issues
UEVR: UObjectHook
What is UObjectHook?
UObjectHook is an extra part of UEVR that can be used to do many things, such as:
- Attach the camera to any object or component in the game
- Add 6DoF motion controls by attaching any components to the motion controllers
- This is usually contingent on the 3DoF motion controls working in the first place
- Modify and view any property of any active UObject in the game
- This can be saved by right clicking the property
- Toggle the visibility of any component in the game
- Save the state of all of the above for persistence across sessions
Important information
UObjectHook is not enabled by default. When giving out profiles, ensure you have "Enabled at Startup" enabled under UObjectHook's config tab.
If a profile received does not work, it is likely because of the above. UObjectHook is not enabled by default, so you need to manually open the UObjectHook menu to enable it if this is the case.
Examples
In the following examples, we'll be using the "First Person Template" from the Unreal Engine.
These are just the simplest examples possible. There are games that will have differently named components. Sometimes you'll need to go through multiple component lists, children, or properties. You'll usually want to be on the lookout for SkeletalMeshComponent components for attachments.
Attaching the camera to an object
In this example, we'll attach the camera to the local player/pawn.
- Open the in-game menu and enable advanced options if not already enabled
- Navigate to UObjectHook on the left side
- Go to "Common Objects"
- Go to "Acknowledged Pawn"
- Click "Attach Camera to" (click "Attach Camera to (Relative)" if the game is already first-person)
- Click "Save State"
Doing this allows you to turn third person games into first person games. If done in a first person game, this removes unwanted camera movement that should not be there in VR.
Attaching components to motion controllers
In this example, we'll attach a component(s) to the motion controllers.
- Open the in-game menu and enable advanced options if not already enabled
- Navigate to UObjectHook on the left side
- Go to "Common Objects"
- Go to "Acknowledged Pawn"
- Go to "Components"
- Click "SkeletalMeshComponent Mesh2P" and uncheck "Visible"
- Click "SkeletalMeshComponent FP_Gun"
- Click "Attach right" or "Attach left" depending on which controller you want to attach to
- Click "Adjust"
- The menu will close, move your controller so that it lines up with the gun in-game
- Open the menu again, and the weapon should be attached to the controller with the correct offset
- Now click "Permanent Change", this will allow the projectiles to fire from the correct location
- Click "Save State"
- Navigate to "Input" on the left side
- Change the "Aim Method" to "Left Controller" or "Right Controller" depending on which controller you attached the weapon to
- You should now have full 6DoF motion controls for the weapon
Glossary
Permanent Change
This means that UEVR will no longer reset the object back to its original position and rotation after rendering is over. This can make projectiles come out of the correct spot with weapons, and make things like colliders work with melee weapons (if they have them).
It is not enabled by default because the user can inadvertently set this option on something that dictates their player position, launching them out of the map.
UEVR: Plugin Development
This section covers the basics of developing plugins for UEVR. If you're looking for information on how to use UEVR, check out the Usage section.
If you are unfamiliar with C/C++, you can try the Blueprint API.
Overview
Plugins in UEVR are developed primarily in C++. However, the API header is written in C. This means it's possible to bind it to other languages, or even just write them in C.
The API header is located in include/uevr/API.h.
The C++ API header is in include/uevr/API.hpp.
The base C++ plugin header is in include/uevr/Plugin.hpp.
Plugin Installation
In the frontend, click the "Open Global Dir" button. Locate the corresponding game directory, and place the DLL in the plugins folder.
During plugin development, you many want to create a symbolic link from the plugins dir to your project's DLL output directory. This way, you can build the plugin and have it automatically load into UEVR.
Plugin Lifecycle
Plugins are loaded and unloaded at runtime. The plugin lifecycle is as follows:
- UEVR starts its initialization process
- UEVR initially loads all plugins, and calls their
DLLMainfunctions- If the plugin is a C++ plugin, the DLLMain function will call the
on_dllmainfunction of the plugin
- If the plugin is a C++ plugin, the DLLMain function will call the
- UEVR begins initializing the rest of its own components
- After initialization, UEVR calls the
on_initializefunction of each plugin - During its execution loop, UEVR will call the various
on_*functions of each plugin - The user can choose to unload all plugins, and reload them at will at runtime
The easy way
Plugin.hpp provides a class that can be inherited from to create a plugin. This class provides a number of virtual functions that can be overridden to implement the plugin's functionality.
The way it is structured is also how you would use the API in C++ using the API.h and API.hpp headers.
Plugin.hpp also implements a DLLMain for you, so you don't have to worry about that. All you need to worry about is overriding the virtual functions.
The project must be compiled as a DLL.
A simple example
#include <memory>

#include "uevr/Plugin.hpp"

using namespace uevr;

#define PLUGIN_LOG_ONCE(...) {\
    static bool _logged_ = false; \
    if (!_logged_) { \
        _logged_ = true; \
        API::get()->log_info(__VA_ARGS__); \
    }}

class ExamplePlugin : public uevr::Plugin {
public:
    ExamplePlugin() = default;

    void on_dllmain() override {}

    void on_initialize() override {
        // Logs to the appdata UnrealVRMod log.txt file
        API::get()->log_error("%s %s", "Hello", "error");
        API::get()->log_warn("%s %s", "Hello", "warning");
        API::get()->log_info("%s %s", "Hello", "info");
    }

    void on_pre_engine_tick(UEVR_UGameEngineHandle engine, float delta) override {
        PLUGIN_LOG_ONCE("Pre Engine Tick: %f", delta);
    }

    void on_post_engine_tick(UEVR_UGameEngineHandle engine, float delta) override {
        PLUGIN_LOG_ONCE("Post Engine Tick: %f", delta);
    }

    void on_pre_slate_draw_window(UEVR_FSlateRHIRendererHandle renderer, UEVR_FViewportInfoHandle viewport_info) override {
        PLUGIN_LOG_ONCE("Pre Slate Draw Window");
    }

    void on_post_slate_draw_window(UEVR_FSlateRHIRendererHandle renderer, UEVR_FViewportInfoHandle viewport_info) override {
        PLUGIN_LOG_ONCE("Post Slate Draw Window");
    }
};

// Actually creates the plugin. Very important that this global is created.
// The fact that it's using std::unique_ptr is not important, as long as the constructor is called in some way.
std::unique_ptr<ExamplePlugin> g_plugin{new ExamplePlugin()};
UEVR: Blueprint API
UEVR implements some functions within the Unreal Engine's existing VR Blueprint API. These functions would usually do nothing because the VR plugins are not present. UEVR implements these functions so modders can easily access HMD and controller data without having to write a C++ plugin.
This should be more familiar to modders, and easier to use than the C++ API. Normal game developers should feel right at home as well.
It should be noted that generating the uproject for interacting with these games is out of UEVR's scope. There are other tools to assist in this, and others may have already generated one somewhere.
UE4SS can assist in generating projects for blueprints.
Official modding tools by the game developers can work here too, if they provide a working uproject.
Automatically handled components
Motion Controller components
When UObjectHook is activated
All UMotionControllerComponent ("Motion Controller") components will have their location and rotation set correctly to the world transform of the user's motion controllers.
This means you can make Motion Controller components in Blueprint and UEVR will handle it for you, as long as you enable UObjectHook. You can then do any logic you wish with the Motion Controller transforms, like parenting a weapon mesh to one of them.
You must correctly set the Motion Source name to either Left or Right. Case sensitive. Or modify the Hand property on older UE versions.
Motion Source can be set to Head or HMD to track the HMD transform.
Implemented functions
Tested and confirmed working on 4.27 and 5.0.3
Load Blueprint Code in the UEVR menu must be turned on or one of the head/controller aiming options must be enabled for these to work.
Some functions explicitly require Load Blueprint Code to be enabled, not just the aiming options.
For more information on these functions, visit the Unreal Engine documentation
Head Mounted Display: Is Head Mounted Display Enabled
Always works on < 4.18. >= 4.18, Load Blueprint Code must be explicitly enabled for this to work.
Head Mounted Display: Get Device Pose
This one only works for the HMD for now. Bit of a hacky implementation, but it works.
Head Mounted Display: Get Orientation And Position
Gets data about the HMD transform. Load Blueprint Code must be explicitly enabled for this to work on >= 4.18.
Head Mounted Display: Get Motion Controller Data
Only works for left and right controller.
Valid, Aim Position, Aim Rotation, Grip Position, Grip Rotation are implemented.
Head Mounted Display: Get XRSystem Flags
Metadata used to inform blueprint about certain things.
enum ECustomSystemFlags : int32_t {
    SYSTEMFLAG_NONE = 0,
    SYSTEMFLAG_HMD_ACTIVE = 1 << 0,
    SYSTEMFLAG_DECOUPLED_PITCH = 1 << 1,
    SYSTEMFLAG_OPENXR = 1 << 2,
    SYSTEMFLAG_OPENVR = 1 << 3,
    SYSTEMFLAG_MOTION_CONTROLLERS_ACTIVE = 1 << 4,
    SYSTEMFLAG_LEFT_THUMBREST_ACTIVE = 1 << 5,
    SYSTEMFLAG_RIGHT_THUMBREST_ACTIVE = 1 << 6,
    SYSTEMFLAG_GAME_AIMING_MODE = 1 << 7,
    SYSTEMFLAG_HEAD_AIMING_MODE = 1 << 8,
    SYSTEMFLAG_LEFT_CONTROLLER_AIMING_MODE = 1 << 9,
    SYSTEMFLAG_RIGHT_CONTROLLER_AIMING_MODE = 1 << 10,
    SYSTEMFLAG_TWO_HANDED_LEFT_AIMING_MODE = 1 << 11,
    SYSTEMFLAG_TWO_HANDED_RIGHT_AIMING_MODE = 1 << 12,
};
Head Mounted Display: Get HMDData
Untested.
Head Mounted Display: Reset Orientation
Head Mounted Display: Reset Position
Head Mounted Display: Reset Orientation and Position
UEVR: Lua API
UEVR provides a Lua API that can be used to create plugins.
Scripts can be loaded under LuaLoader, and are automatically loaded from <game config folder>/scripts/*.lua.
The Lua API can also be loaded in different environments, like UE4SS. UEVR comes with a LuaVR.dll for this purpose.
Example
print("Initializing hello_world.lua")

UEVR_UObjectHook.activate()

local api = uevr.api;
local uobjects = uevr.types.FUObjectArray.get()

print("Printing first 5 UObjects")
for i=0, 5 do
    local uobject = uobjects:get_object(i)

    if uobject ~= nil then
        print(uobject:get_full_name())
    end
end

local once = true
local last_world = nil
local last_level = nil

uevr.sdk.callbacks.on_post_engine_tick(function(engine, delta)

end)

local spawn_once = true

uevr.sdk.callbacks.on_pre_engine_tick(function(engine, delta)
    --[[if spawn_once then
        local cheat_manager_c = api:find_uobject("Class /Script/Engine.CheatManager")
        local cheat_manager = UEVR_UObjectHook.get_first_object_by_class(cheat_manager_c)

        print(tostring(cheat_manager_c))

        cheat_manager:Summon("Something_C")

        spawn_once = false
    end]]

    local game_engine_class = api:find_uobject("Class /Script/Engine.GameEngine")
    local game_engine = UEVR_UObjectHook.get_first_object_by_class(game_engine_class)

    local viewport = game_engine.GameViewport
    if viewport == nil then
        print("Viewport is nil")
        return
    end
    local world = viewport.World

    if world == nil then
        print("World is nil")
        return
    end

    if world ~= last_world then
        print("World changed")
    end

    last_world = world

    local level = world.PersistentLevel

    if level == nil then
        print("Level is nil")
        return
    end

    if level ~= last_level then
        print("Level changed")
        print("Level name: " .. level:get_full_name())

        local game_instance = game_engine.GameInstance

        if game_instance == nil then
            print("GameInstance is nil")
            return
        end

        local local_players = game_instance.LocalPlayers

        for i in ipairs(local_players) do
            local player = local_players[i]
            local player_controller = player.PlayerController
            local pawn = player_controller.Pawn

            if pawn ~= nil then
                print("Pawn: " .. pawn:get_full_name())
                --pawn.BaseEyeHeight = 0.0
                --pawn.bActorEnableCollision = not pawn.bActorEnableCollision

                local actor_component_c = api:find_uobject("Class /Script/Engine.ActorComponent");
                print("actor_component_c class: " .. tostring(actor_component_c))
                local test_component = pawn:GetComponentByClass(actor_component_c)

                print("TestComponent: " .. tostring(test_component))

                local controller = pawn.Controller

                if controller ~= nil then
                    print("Controller: " .. controller:get_full_name())

                    local velocity = controller:GetVelocity()
                    print("Velocity: " .. tostring(velocity.x) .. ", " .. tostring(velocity.y) .. ", " .. tostring(velocity.z))

                    local test = Vector3d.new(1.337, 1.0, 1.0)
                    print("Test: " .. tostring(test.x) .. ", " .. tostring(test.y) .. ", " .. tostring(test.z))

                    controller:SetActorScale3D(Vector3d.new(1.337, 1.0, 1.0))

                    local actor_scale_3d = controller:GetActorScale3D()
                    print("ActorScale3D: " .. tostring(actor_scale_3d.x) .. ", " .. tostring(actor_scale_3d.y) .. ", " .. tostring(actor_scale_3d.z))


                    local control_rotation = controller:GetControlRotation()

                    print("ControlRotation: " .. tostring(control_rotation.Pitch) .. ", " .. tostring(control_rotation.Yaw) .. ", " .. tostring(control_rotation.Roll))
                    control_rotation.Pitch = 1.337

                    controller:SetControlRotation(control_rotation)
                    control_rotation = controller:GetControlRotation()

                    print("New ControlRotation: " .. tostring(control_rotation.Pitch) .. ", " .. tostring(control_rotation.Yaw) .. ", " .. tostring(control_rotation.Roll))
                end

                local primary_actor_tick = pawn.PrimaryActorTick

                if primary_actor_tick ~= nil then
                    print("PrimaryActorTick: " .. tostring(primary_actor_tick))

                    -- Print various properties, this is testing of StructProperty as PrimaryActorTick is a struct
                    local tick_interval = primary_actor_tick.TickInterval
                    print("TickInterval: " .. tostring(tick_interval))

                    print("bAllowTickOnDedicatedServer: " .. tostring(primary_actor_tick.bAllowTickOnDedicatedServer))
                    print("bCanEverTick: " .. tostring(primary_actor_tick.bCanEverTick))
                    print("bStartWithTickEnabled: " .. tostring(primary_actor_tick.bStartWithTickEnabled))
                    print("bTickEvenWhenPaused: " .. tostring(primary_actor_tick.bTickEvenWhenPaused))
                else
                    print("PrimaryActorTick is nil")
                end

                local control_input_vector = pawn.ControlInputVector
                pawn.ControlInputVector.x = 1.337

                print("ControlInputVector: " .. tostring(control_input_vector.x) .. ", " .. tostring(control_input_vector.y) .. ", " .. tostring(control_input_vector.z))

                local is_actor_tick_enabled = pawn:IsActorTickEnabled()
                print("IsActorTickEnabled: " .. tostring(is_actor_tick_enabled))

                pawn:SetActorTickEnabled(not is_actor_tick_enabled)
                is_actor_tick_enabled = pawn:IsActorTickEnabled()
                print("New IsActorTickEnabled: " .. tostring(is_actor_tick_enabled))

                pawn:SetActorTickEnabled(not is_actor_tick_enabled) -- resets it back to default

                local life_span = pawn:GetLifeSpan()
                local og_life_span = life_span
                print("LifeSpan: " .. tostring(life_span))

                pawn:SetLifeSpan(10.0)
                life_span = pawn:GetLifeSpan()

                print("New LifeSpan: " .. tostring(life_span))
                pawn:SetLifeSpan(og_life_span) -- resets it back to default

                local net_driver_name = pawn.NetDriverName:to_string()

                print("NetDriverName: " .. net_driver_name)
            end

            if player_controller ~= nil then
                print("PlayerController: " .. player_controller:get_full_name())
            end
        end

        print("Local players: " .. tostring(local_players))
    end

    last_level = level

    if once then
        print("executing stat fps")
        uevr.api:execute_command("stat fps")
        once = false

        print("executing stat unit")
        uevr.api:execute_command("stat unit")

        print("GameEngine class: " .. game_engine_class:get_full_name())
        print("GameEngine object: " .. game_engine:get_full_name())
    end
end)

uevr.sdk.callbacks.on_script_reset(function()
    print("Resetting hello_world.lua")
end)
Example (when integrated into an environment like UE4SS)
local LuaVR = require("LuaVR")

local function vr_print(text)
    print("[LuaVR Script] " .. text .. "\n")
end

local params = LuaVR.params
local callbacks = params.sdk.callbacks

local total_t = 0.0

-- Example usage of callbacks
callbacks.on_pre_engine_tick(function(engine, delta)
    total_t = total_t + delta
end)

-- Modifies the camera position
callbacks.on_post_calculate_stereo_view_offset(function(device, view_index, world_to_meters, position, rotation, is_double)
    position.z = position.z + 100.0
    position.y = position.y - 100.0
end)


-- UEVR_PluginInitializeParam

-- UEVR_PluginVersion
vr_print("Major: " .. tostring(params.version.major))
vr_print("Minor: " .. tostring(params.version.minor))
vr_print("Patch: " .. tostring(params.version.patch))

-- UEVR_PluginFunctions
vr_print("Is drawing ui: " .. tostring(params.functions.is_drawing_ui()))
params.functions.log_info("Hello from LuaVR!")
params.functions.log_warn("Hello from LuaVR!")
params.functions.log_error("Hello from LuaVR!")

-- UEVR_VRData
vr_print("Runtime ready state: " .. tostring(params.vr.is_runtime_ready()))
vr_print("Is OpenVR: " .. tostring(params.vr.is_openvr()))
vr_print("Is OpenXR: " .. tostring(params.vr.is_openxr()))
vr_print("Is HMD Active: " .. tostring(params.vr.is_hmd_active()))

local standing_origin = UEVR_Vector3f.new()
params.vr.get_standing_origin(standing_origin)
vr_print("Standing Origin: " .. tostring(standing_origin.x) .. ", " .. tostring(standing_origin.y) .. ", " .. tostring(standing_origin.z))

local rotation_offset = UEVR_Vector3f.new()
params.vr.get_rotation_offset(rotation_offset)
vr_print("Rotation Offset: " .. tostring(rotation_offset.x) .. ", " .. tostring(rotation_offset.y) .. ", " .. tostring(rotation_offset.z))

local hmd_index = params.vr.get_hmd_index()
vr_print("HMD Index: " .. tostring(hmd_index))

local left_controller_index = params.vr.get_left_controller_index()
vr_print("Left Controller Index: " .. tostring(left_controller_index))

local right_controller_index = params.vr.get_right_controller_index()
vr_print("Right Controller Index: " .. tostring(right_controller_index))

local hmd_position = UEVR_Vector3f.new()
local hmd_rotation = UEVR_Quaternionf.new()
params.vr.get_pose(hmd_index, hmd_position, hmd_rotation)

vr_print("HMD Position: " .. tostring(hmd_position.x) .. ", " .. tostring(hmd_position.y) .. ", " .. tostring(hmd_position.z))
vr_print("HMD Rotation: " .. tostring(hmd_rotation.x) .. ", " .. tostring(hmd_rotation.y) .. ", " .. tostring(hmd_rotation.z) .. ", " .. tostring(hmd_rotation.w))

if left_controller_index ~= -1 then
    local left_controller_position = UEVR_Vector3f.new()
    local left_controller_rotation = UEVR_Quaternionf.new()
    params.vr.get_pose(left_controller_index, left_controller_position, left_controller_rotation)

    vr_print("Left Controller Position: " .. tostring(left_controller_position.x) .. ", " .. tostring(left_controller_position.y) .. ", " .. tostring(left_controller_position.z))
    vr_print("Left Controller Rotation: " .. tostring(left_controller_rotation.x) .. ", " .. tostring(left_controller_rotation.y) .. ", " .. tostring(left_controller_rotation.z) .. ", " .. tostring(left_controller_rotation.w))
end

if right_controller_index ~= -1 then
    local right_controller_position = UEVR_Vector3f.new()
    local right_controller_rotation = UEVR_Quaternionf.new()
    params.vr.get_pose(right_controller_index, right_controller_position, right_controller_rotation)

    vr_print("Right Controller Position: " .. tostring(right_controller_position.x) .. ", " .. tostring(right_controller_position.y) .. ", " .. tostring(right_controller_position.z))
    vr_print("Right Controller Rotation: " .. tostring(right_controller_rotation.x) .. ", " .. tostring(right_controller_rotation.y) .. ", " .. tostring(right_controller_rotation.z) .. ", " .. tostring(right_controller_rotation.w))
end

local left_eye_offset = UEVR_Vector3f.new()
local right_eye_offset = UEVR_Vector3f.new()

params.vr.get_eye_offset(0, left_eye_offset)
params.vr.get_eye_offset(1, right_eye_offset)

vr_print("Left Eye Offset: " .. tostring(left_eye_offset.x) .. ", " .. tostring(left_eye_offset.y) .. ", " .. tostring(left_eye_offset.z))
vr_print("Right Eye Offset: " .. tostring(right_eye_offset.x) .. ", " .. tostring(right_eye_offset.y) .. ", " .. tostring(right_eye_offset.z))

local is_using_controllers = params.vr.is_using_controllers()
vr_print("Is Using Controllers: " .. tostring(is_using_controllers))
uevr.params
Points to UEVR_PluginInitializeParam.
uevr.api
Members
uevr.api.sdk
Functions
uevr.api:find_uobject(name: string)
Searches the UEVR_FUObjectArray for an object with the specified name. Returns the object as a UEVR_UObject* object, or nil if not found.
Should not be constantly used, unless it is for class objects, or objects that are only created once. Otherwise, use UClass:get_objects_matching instead or the equivalent UEVR_UObjectHook functions.
uevr.api:get_engine()
Returns the global UGameEngine object.
uevr.api:get_player_controller(index: number)
Returns the player controller at the specified index, which is a UEVR_UObject* object.
uevr.api:get_local_pawn(index: number)
Returns the local pawn at the specified index, which is a UEVR_UObject* object.
uevr.api:spawn_object(class: UClass*, outer: UObject*)
Attempts to spawn an object of the specified class with the specified outer object. Returns the spawned object as a UEVR_UObject* object.
uevr.api:add_component_by_class(actor: UObject*, class: UClass*, deferred: bool = false)
Unified, simplified function that adds a component to an actor, on UE4 and UE5 with default transforms setup. Automatically calls FinishAddComponent if deferred is false.
uevr.api:execute_command(command: string)
Executes the specified console command. Does not operate 1:1 with the native UE console, as it does not pass the command onto the player controller, but should work with most commands.
uevr.api:get_uobject_array()
Returns the UEVR_FUObjectArray instance.
uevr.api:get_console_manager()
Returns the FConsoleManager instance.
uevr.api:dispatch_custom_event(event_name: string, event_data: string)
Dispatches an event that can be listened to on the C/C++ plugin side via on_custom_event.
uevr.sdk.callbacks
Functions
uevr.sdk.callbacks.on_xinput_get_state(fn)
Registers a callback to be called when XInput state is requested.
Prototype: function(retval: uint32, user_index: uint32, state: XINPUT_STATE*)
uevr.sdk.callbacks.on_xinput_set_state(fn)
Registers a callback to be called when XInput state is set.
Prototype: function(retval: uint32, user_index: uint32, state: XINPUT_VIBRATION*)
uevr.sdk.callbacks.on_pre_engine_tick(fn)
Registers a callback to be called before the engine tick.
Prototype: function(engine: void*, delta_time: float)
uevr.sdk.callbacks.on_post_engine_tick(fn)
Registers a callback to be called after the engine tick.
Prototype: function(engine: void*, delta_time: float)
uevr.sdk.callbacks.on_pre_slate_draw_window_render_thread(fn)
Registers a callback to be called before the slate window is drawn on the render thread.
Prototype: function(renderer: UEVR_FSlateRHIRendererHandle, viewport_info: UEVR_FViewportInfoHandle)
uevr.sdk.callbacks.on_post_slate_draw_window_render_thread(fn)
Registers a callback to be called after the slate window is drawn on the render thread.
Prototype: function(renderer: UEVR_FSlateRHIRendererHandle, viewport_info: UEVR_FViewportInfoHandle)
uevr.sdk.callbacks.on_pre_calculate_stereo_view_offset(fn)
Registers a callback to be called before VR transformations are applied to the view.
Prototype: function(device: UEVR_StereoRenderingDeviceHandle, view_index: int, world_to_meters: float, position: Vector3f* or Vector3d*, rotation: Quaternionf* or Quaterniond*, is_double: bool)
uevr.sdk.callbacks.on_post_calculate_stereo_view_offset(fn)
Registers a callback to be called after VR transformations are applied to the view.
Prototype: function(device: UEVR_StereoRenderingDeviceHandle, view_index: int, world_to_meters: float, position: Vector3f* or Vector3d*, rotation: Quaternionf* or Quaterniond*, is_double: bool)
uevr.sdk.callbacks.on_pre_viewport_client_draw(fn)
Registers a callback to be called before the viewport is drawn on the game thread.
Prototype: function(viewport: UEVR_FViewportClientHandle, viewport: UEVR_FViewportHandle canvas: UEVR_FCanvasHandle)
uevr.sdk.callbacks.on_post_viewport_client_draw(fn)
Registers a callback to be called after the viewport is drawn on the game thread.
Prototype: function(viewport: UEVR_FViewportClientHandle, viewport: UEVR_FViewportHandle canvas: UEVR_FCanvasHandle)
uevr.sdk.callbacks.on_frame(fn)
Registers a callback to be called every frame. For ImGui functionality.
Prototype: function()
uevr.sdk.callbacks.on_draw_ui(fn)
Registers a callback to be called when the UI is drawn. For ImGui functionality that should be constrained to the UEVR window.
uevr.sdk.callbacks.on_script_reset(fn)
Registers a callback to be called when the Lua script is reset. Script cleanup should be performed here.
uevr.sdk.callbacks.on_lua_event(fn)
Registers a callback that can be triggered when a C plugin dispatches an event for Lua.
Prototype: function(event_name: string, event_data: string)
lua
Can be accessed with uevr.lua.
Not accessible via LuaVR.dll (e.g. from UE4SS Lua). UEVR only.
Methods
uevr.lua.add_script_panel(name, fn)
Adds a script panel/sidebar that can be used to run imgui code.
Example
uevr.lua.add_script_panel("TEST!!!", function()
    imgui.text("test")
end)
uevr.types
Members
uevr.types.UObject
uevr.types.UStruct
uevr.types.UClass
uevr.types.UFunction
uevr.types.FField
uevr.types.FFieldClass
uevr.types.FConsoleManager
uevr.types.IConsoleObject
uevr.types.IConsoleVariable
uevr.types.IConsoleCommand
uevr.types.FName
uevr.types.FUObjectArray
uevr.types.UObjectHook
UEVR_UObject
What is UObject?
UObject are objects that are part of the Unreal Engine's object system. They are backed by a UClass and can be used to represent anything in the game, such as actors, components, and more.
Meta Functions
object:__index(key: string)
Wrapper for object:get_property(key). Can be used to call functions on the UObject.
ex:
obj:SomeFunction()
local asdf = obj.SomeProperty
StructProperty arguments can be passed via table:
local color = {R = 0.0, G = 0.0, B = 1.0, A = 1.0}
obj:SomeColorFn(color)
Or via StructObject.new(class).
Out arguments can be retrieved by passing an empty table:
local out = {}
obj:SomeOutFunction(out)

local result = out.result
object:__newindex(key: string, value: any)
Wrapper for object:set_property(key, value)
ex:
obj.SomeProperty = 123
Functions
UEVR_UObject.static_class()
Returns the UEVR_UClass* descriptor for UObject.
obj:get_address()
Returns the base address of the UObject.
obj:get_fname()
Returns a UEVR_FName object.
obj:get_full_name()
Returns the full name of the UObject as a Lua string.
obj:is_a(class: UClass*)
Returns true if the UObject is an instance of the specified class.
obj:as_class()
Returns the UObject as an instance of UEVR_UClass, or nil if it is not a class.
obj:as_struct()
Returns the UObject as an instance of UEVR_UStruct, or nil if it is not a struct.
obj:as_function()
Returns the UObject as an instance of UEVR_UFunction, or nil if it is not a function.
obj:get_class()
Returns the UEVR_UClass* object of the UObject.
obj:get_outer()
Returns the outer UEVR_UObject* of the UObject.
obj:get_property(name: string)
Returns the value of the specified property of the UObject.
obj:set_property(name: string, value: any)
Sets the value of the specified property of the UObject. Not all properties are supported.
obj:call(name: string, args...)
Calls the specified function of the UObject with the specified arguments.
obj:DANGEROUS_call_member_virtual(index: int, rdx, r8, r9)
Calls a virtual function at the specified index with the MSVC x64 calling convention.
UEVR_UStruct
What is UStruct?
UStruct is a type that represents a descriptor for a struct in Unreal Engine. Objects that can be described by a UStruct (but not a UClass) are usually POD types or simple data structures like FVector.
UStruct inherits all the functions from UEVR_UObject.
Functions
UEVR_UStruct.static_class()
Returns the UEVR_UClass* descriptor for UStruct.
struct:get_super_struct()
Returns the UEVR_UStruct* object of the super struct.
struct:get_super()
Same as struct:get_super_struct().
struct:find_function(name: string)
Returns the UEVR_UFunction* object of the function with the specified name.
struct:find_property(name: string)
Returns the UEVR_FProperty object of the property with the specified name.
struct:get_child_properties()
Returns the first UEVR_FProperty* object of the struct. Use property:get_next() to iterate through the properties.
struct:get_properties_size()
Returns the total byte size of the properties of the struct.
UEVR_UClass
What is UClass?
UClass acts as a descriptor for a class in Unreal Engine. It contains reflected information about the class, such as its name, properties, and functions.
UClass inherits all the functions from UEVR_UStruct.
Functions
UEVR_UClass.static_class()
Returns the UEVR_UClass* descriptor for UClass.
class:get_class_default_object()
Returns the default UEVR_UObject* object for the class.
class:get_objects_matching(allow_default: bool)
Returns an array of UEVR_UObject* objects that are instances of the class. If allow_default is true, default objects are included in the array.
class:get_first_object_matching(allow_default: bool)
Returns the first UEVR_UObject* object that is an instance of the class. If allow_default is true, default objects are included in the search.
UEVR_UFunction
What is UFunction?
UFunction is a type that represents a function in Unreal Engine. Functions are usually associated with a UClass and can be called on instances of that class.
UFunction inherits all the functions from UEVR_UStruct.
Functions
UEVR_UFunction.static_class()
Returns the UEVR_UClass* descriptor for UFunction.
function:call(obj, args_ptr)
Not implemented correctly. Do not use. Use obj:FuncName(args...) instead.
function:get_native_function()
Returns the native function pointer of the UFunction as a void*.
function:hook_ptr(pre, post)
Hooks the UFunction with the specified pre and post function pointers. Functions can be nil if you only want to use one but not the other.
Pre Signature: bool pre(fn: UFunction*, obj: UObject*, locals: StructObject*, result: void*)
Return false to skip the original function. Not returning at all is equivalent to returning true.
Post Signature: void post(fn: UFunction*, obj: UObject*, locals: StructObject*, result: void*)
UEVR_FName
What is FName?
FName is a struct that represents a name in Unreal Engine.
Functions
name:to_string()
Returns a Lua string representation of the name.
UEVR_FField
What is FField?
FField is a struct that represents a field in Unreal Engine.
Functions
field:get_next()
Returns the next UEVR_FField* object in the linked list of fields.
field:get_fname()
Returns the UEVR_FName object of the field name.
field:get_class()
Returns the UEVR_FFieldClass object of the field.
UEVR_FFieldClass
What is FFieldClass?
FFieldClass is a struct that represents a class of a field in Unreal Engine.
Functions
class:get_fname()
Returns the UEVR_FName object of the class.
class:get_name()
Returns the name of the class as a Lua string.
UEVR_FUObjectArray
What is FUObjectArray?
FUObjectArray is a struct that contains a list of all UObject instances in Unreal Engine.
Functions
UEVR_FUObjectArray.get()
Returns the instance of the FUObjectArray.
arr:is_chunked()
Returns true if the array is chunked.
arr:is_inlined()
Returns true if the array is inlined.
arr:get_objects_offset()
Returns the offset of the objects in the array.
arr:get_item_distance()
Returns the distance between items in the array.
arr:get_object_count()
Returns the number of objects in the array.
arr:get_objects_ptr()
arr:get_object(index: number)
Returns the UEVR_UObject* object at the specified index.
arr:get_item(index: number)
Returns the UEVR_FUObjectItem* object at the specified index.
UEVR_FConsoleManager
Instance can be obtained with uevr.api:get_console_manager().
Functions
console:get_console_objects()
Returns a TArray<ConsoleObjectElement> of console objects.
console:find_object(name: string)
Returns the IConsoleObject object with the specified name.
console:find_variable(name: string)
Returns the IConsoleVariable object with the specified name.
console:find_command(name: string)
Returns the IConsoleCommand object with the specified name.
UEVR_IConsoleObject
IConsoleObject is a base class for console objects.
Functions
obj:as_command()
Returns the IConsoleCommand object if the console object is a command, or nil if it is not.
UEVR_IConsoleVariable
IConsoleVariable is a class representing a console variable.
Inherits from IConsoleObject.
Functions
var:set(value: any)
Sets the value of the console variable.
value can be a number or a string.
var:set_float(value: number)
var:set_int(value: number)
var:set_ex(value: any, flags: number)
var:get_int()
Returns the value of the console variable as an integer.
var:get_float()
Returns the value of the console variable as a float.
UEVR_IConsoleCommand
IConsoleCommand is a class representing a console command.
Inherits from IConsoleObject.
Functions
cmd:execute(args: string)
UEVR_UObjectHook
What is UObjectHook?
UObjectHook is a UEVR defined class that hooks into the UObject creation and destruction process. It is used to track UObject instances with minimal performance overhead.
It is also used to add motion controls.
UObjectHook uses all static functions.
Functions
UEVR_UObjectHook.activate
Activates the UObjectHook. Some of the below functions automatically activate the UObjectHook if it is not already active.
UEVR_UObjectHook.exists(obj: UObject*)
Returns true if the specified UObject currently exists.
UEVR_UObjectHook.is_disabled
Returns true if the UObjectHook is disabled.
UEVR_UObjectHook.set_disabled(disabled: bool)
Sets the disabled state of the UObjectHook.
UEVR_UObjectHook.get_first_object_by_class(class: UClass*, allow_default: bool)
Returns the first UObject instance of the specified class. If allow_default is true, default objects are included in the search.
UEVR_UObjectHook.get_objects_by_class(class: UClass*, allow_default: bool)
Returns an array of UObject instances of the specified class. If allow_default is true, default objects are included in the array.
UEVR_UObjectHook.get_or_add_motion_controller_state(obj: UObject*)
Returns the motion controller state for the specified UObject. If the state does not exist, it is created.
UEVR_UObjectHook.get_motion_controller_state(obj: UObject*)
Returns the motion controller state for the specified UObject. If the state does not exist, returns nil.
UEVR_MotionControllerState
Functions
state:set_rotation_offset(offset: variant)
Sets the rotation offset of the motion controller state.offset can be a UEVR_Quaternionf, a Vector4f, or a Vector3d.
state:set_location_offset(offset: variant)
Sets the location offset of the motion controller state.offset can be a UEVR_Vector3f, a Vector3f, or a Vector3d.
state:set_hand(hand: int)
Sets the hand of the motion controller state.hand can be 0 for left hand or 1 for right hand, or 2 for the HMD.
state:set_permanant(permanent: bool)
Sets the permanant flag of the motion controller state. Permanent meaning UObjectHook will not reset the rotation or location at the end of the tick.
StructObject
StructObject is a custom UEVR Lua type that represents a struct in Unreal Engine. It's for non-UObject based structs which support reflection.
Functions
StructObject.new(struct: UEVR_UStruct*)
Constructs a new StructObject from a UEVR_UStruct pointer.
StructObject.new(object: UEVR_UObject*)
Constructs a new StructObject from a UEVR_UObject pointer, if the object inherits from UStruct.
C Wrapper Types
UEVR_VRData
Accessed with uevr.params.vr
Static functions. Use . operator. Exception is vr:get_mod_value
Functions
vr.is_runtime_ready()
Returns true if the VR runtime is ready.
vr.is_openvr()
Returns true if the VR runtime is OpenVR.
vr.is_openxr()
Returns true if the VR runtime is OpenXR.
vr.is_hmd_active()
Returns true if the HMD is active. Usually meaning the headset is on and tracking.
vr.get_standing_origin(out standing_origin: UEVR_Vector3f)
Returns the standing origin of the HMD.
vr.get_rotation_offset(out rotation_offset: UEVR_Quaternionf)
Returns the rotation offset of the HMD.
vr.set_standing_origin(standing_origin: UEVR_Vector3f)
Sets the standing origin of the HMD.
vr.set_rotation_offset(rotation_offset: UEVR_Quaternionf)
Sets the rotation offset of the HMD.
vr.get_hmd_index()
Returns the index of the HMD.
vr.get_left_controller_index()
Returns the index of the left controller.
vr.get_right_controller_index()
Returns the index of the right controller.
vr.get_pose(index: number, out position: UEVR_Vector3f, out rotation: UEVR_Quaternionf)
Returns the pose of the specified device.
vr.get_transform(index: number, out transform: UEVR_Transform)
Returns the transform of the specified device.
vr.get_eye_offset(index: number, out eye_offset: UEVR_Vector3f)
Returns the eye offset of the specified eye.
vr.get_ue_projection_matrix(index: number, out projection_matrix: UEVR_Matrix4f)
Returns the projection matrix of the specified eye.
vr.get_left_joystick_source()
Returns the source handle of the left joystick.
vr.get_right_joystick_source()
Returns the source handle of the right joystick.
vr.get_action_handle(action_name: string)
Returns the handle of the specified action.
vr.is_action_active(action_handle: UEVR_ActionHandle, source: UEVR_InputSourceHandle)
Returns true if the specified action is active.
vr.is_action_active_any_joystick(action_handle: UEVR_ActionHandle)
Returns true if the specified action is active.
vr.get_joystick_axis(index: number, out axis: UEVR_Vector2f)
Returns the axis of the specified joystick.
vr.trigger_haptic_vibration(seconds_from_now: number, duration: number, frequency: number, amplitude: number, source_handle: number)
Triggers haptic vibration on the specified device.
vr.is_using_controllers()
Returns true if the VR system is using controllers within the past 30 seconds.
vr.get_lowest_xinput_index()
vr.recenter_view()
Recenters the view.
vr.recenter_horizon()
Recenters the horizon.
vr.get_aim_method()
Returns the aim method as an integer.
vr.set_aim_method(aim_method: number)
Sets the aim method.
vr.is_aim_allowed()
Returns true if aiming is allowed.
vr.set_aim_allowed(aim_allowed: bool)
Sets whether aiming is allowed.
vr.get_hmd_width()
Returns the render width of the HMD.
vr.get_hmd_height()
Returns the render height of the HMD.
vr.get_ui_width()
Returns the render width of the UI.
vr.get_ui_height()
Returns the render height of the UI.
vr.is_snap_turn_enabled()
Returns true if snap turning is enabled.
vr.set_snap_turn_enabled(snap_turn_enabled: bool)
Sets whether snap turning is enabled.
vr.set_decoupled_pitch_enabled(decoupled_pitch_enabled: bool)
Sets whether decoupled pitch is enabled.
vr.set_mod_value(name: string, value: string)
Sets the value of the specified mod.
vr:get_mod_value(name: string)
Returns the value of the specified mod as a Lua string.
This is a special function that requires use of : instead of . because it uses a custom function, not the original function.
vr.save_config()
Saves the configuration.
vr.reload_config()
Reloads the configuration.
UEVR_PluginInitializeParam
Accessed with uevr.params.
Members
params.uevr_module
The HMODULE of UEVR.
params.version
The version of UEVR's plugin API.
Returns:
typedef struct {
    int major;
    int minor;
    int patch;
} UEVR_PluginVersion;
params.functions
Returns UEVR_PluginFunctions.
params.callbacks
Returns UEVR_PluginCallbacks.
params.renderer
Returns UEVR_RendererData.
params.vr
Returns UEVR_VRData.
params.openvr
Returns UEVR_OpenVRData.
params.openxr
Returns UEVR_OpenXRData.
params.sdk
Returns UEVR_SDKData.
UEVR_PluginInitializeParam
Accessed with uevr.params.functions
Members
functions.log_error(msg)
Logs an error message.
functions.log_warning(msg)
Logs a warning message.
functions.log_info(msg)
Logs an info message.
functions.is_drawing_ui()
Returns true if UEVR is drawing its menu.
functions.get_commit_hash()
Returns the commit hash of UEVR.
functions.get_tag()
Returns the tag of UEVR.
functions.get_tag_long()
Returns the long tag of UEVR.
functions.get_branch()
Returns the branch of UEVR.
functions.get_build_date()
Returns the build date of UEVR.
functions.get_build_time()
Returns the build time of UEVR.
functions.get_commits_past_tag()
Returns the number of commits past the last tag.
functions.get_total_commits()
Returns the total number of commits to UEVR.
Third Party
XInput
Globals
XINPUT_GAMEPAD_DPAD_UP
The D-Pad up button.
XINPUT_GAMEPAD_DPAD_DOWN
The D-Pad down button.
XINPUT_GAMEPAD_DPAD_LEFT
The D-Pad left button.
XINPUT_GAMEPAD_DPAD_RIGHT
The D-Pad right button.
XINPUT_GAMEPAD_START
The Start button.
XINPUT_GAMEPAD_BACK
The Back button.
XINPUT_GAMEPAD_LEFT_THUMB
The left thumbstick button.
XINPUT_GAMEPAD_RIGHT_THUMB
The right thumbstick button.
XINPUT_GAMEPAD_LEFT_SHOULDER
The left shoulder button.
XINPUT_GAMEPAD_RIGHT_SHOULDER
The right shoulder button.
XINPUT_GAMEPAD_A
The A button.
XINPUT_GAMEPAD_B
The B button.
XINPUT_GAMEPAD_X
The X button.
XINPUT_GAMEPAD_Y
The Y button.
XINPUT_STATE
Fields
dwPacketNumber
The packet number of the state. uint32
Gamepad
The gamepad state. XINPUT_GAMEPAD
XINPUT_VIBRATION
Fields
wLeftMotorSpeed
The speed of the left motor. uint16
wRightMotorSpeed
The speed of the right mightor. uint16
XINPUT_GAMEPAD
Fields
wButtons
The current state of the controller buttons. uint16
bLeftTrigger
The current state of the left trigger. uint8
bRightTrigger
The current state of the right trigger. uint8
sThumbLX
The current state of the left thumbstick X axis. int16
sThumbLY
The current state of the left thumbstick Y axis. int16
sThumbRX
The current state of the right thumbstick X axis. int16
sThumbRY
The current state of the right thumbstick Y axis. int16
imgui
Bindings for ImGui. Can be used in the uevr.sdk.callbacks.on_draw_ui callback.
Example:
local thing = 1
local things = { "hi", "hello", "howdy", "hola", "aloha" }

uevr.sdk.callbacks.on_draw_ui(function()
    if imgui.button("Whats up") then
        thing = 1
    end

    local changed, new_thing = imgui.combo("Greeting", thing, things)
    if changed then thing = new_thing end
end)
Enums
imgui.TableSortSpecs
imgui.TableColumnSortSpecs
imgui.TableFlags
imgui.ColumnFlags
imgui.ImGuiKey
imgui.ImGuiStyleVar
Methods
imgui.begin_window(name, open, flags)
Creates a new window with the title of name.
open is a bool. Can be nil. If not nil, a close button will be shown in the top right of the window.
flags - ImGuiWindowFlags.
begin_window must have a corresponding end_window call.
This function may only be called in on_frame, not on_draw_ui.
Returns a bool. Returns false if the user wants to close the window.
imgui.end_window()
Ends the last begin_window call. Required.
imgui.begin_child_window(size, border, flags)
size - Vector2f
border - bool
flags - ImGuiWindowFlags
imgui.end_child_window()
imgui.begin_group()
imgui.end_group()
imgui.begin_rect()
imgui.end_rect(additional_size, rounding)
These two methods draw a rectangle around the elements between begin_rect and end_rect
imgui.begin_disabled(disabled=true)
imgui.end_disabled()
These two methods will disable and darken elements in between it.
imgui.button(label, size)
Draws a button with label text, and optional size.
size is a Vector2f or a size 2 array.
Returns true when the user presses the button.
imgui.small_button(label)
imgui.invisible_button(id, size, flags)
size is a Vector2f or a size 2 array.
imgui.arrow_button(id, dir)
dir is an ImguiDir
imgui.text(text)
Draws text.
imgui.text_colored(text, color)
Draws text with color.
color is an integer color in the form ARGB.
imgui.checkbox(label, value)
Returns a tuple of changed, value
imgui.drag_float(label, value, speed, min, max, display_format (optional))
Returns a tuple of changed, value
imgui.drag_float2(label, value (Vector2f), speed, min, max, display_format (optional))
Returns a tuple of changed, value
imgui.drag_float3(label, value (Vector3f), speed, min, max, display_format (optional))
Returns a tuple of changed, value
imgui.drag_float4(label, value (Vector4f), speed, min, max, display_format (optional))
Returns a tuple of changed, value
imgui.drag_int(label, value, speed, min, max, display_format (optional))
Returns a tuple of changed, value
imgui.slider_float(label, value, min, max, display_format (optional))
Returns a tuple of changed, value
imgui.slider_int(label, value, min, max, display_format (optional))
Returns a tuple of changed, value
imgui.input_text(label, value, flags (optional))
Returns a tuple of changed, value, selection_start, selection_end
imgui.input_text_multiline(label, value, size, flags (optional))
Returns a tuple of changed, value, selection_start, selection_end
imgui.combo(label, selection, values)
Returns a tuple of changed, value.
changed = true when selection changes.
value is the selection index within values (a table)
values can be a table with any type of keys, as long as the values are strings.
imgui.color_picker(label, color, flags)
Returns a tuple of changed, value. color is an integer color in the form ABGR which imgui and draw APIs expect.
imgui.color_picker_argb(label, color, flags)
Returns a tuple of changed, value. color is an integer color in the form ARGB.
imgui.color_picker3(label, color (Vector3f), flags)
Returns a tuple of changed, value
imgui.color_picker4(label, color (Vector4f), flags)
Returns a tuple of changed, value
imgui.color_edit(label, color, flags)
Returns a tuple of changed, value. color is an integer color in the form ABGR which imgui and draw APIs expect.
imgui.color_edit_argb(label, color, flags)
Returns a tuple of changed, value. color is an integer color in the form ARGB.
imgui.color_edit3(label, color (Vector3f), flags)
Returns a tuple of changed, value
imgui.color_edit4(label, color (Vector4f), flags)
Returns a tuple of changed, value
flags for color_picker/edit APIs: ImGuiColorEditFlags
imgui.tree_node(label)
imgui.tree_node_ptr_id(id, label)
imgui.tree_node_str_id(id, label)
imgui.tree_pop()
All of the above tree functions must have a corresponding tree_pop!
imgui.same_line()
imgui.spacing()
imgui.new_line()
imgui.is_item_hovered(flags)
imgui.is_item_active()
imgui.is_item_focused()
imgui.collapsing_header(name)
imgui.load_font(filepath, size, [ranges])
Loads a font file from the reframework/fonts subdirectory at the specified size with optional Unicode ranges (an array of start, end pairs ending with 0). Returns a handle for use with imgui.push_font(). If filepath is nil, it will load the default font at the specified size.
imgui.push_font(font)
Sets the font to be used for the next set of ImGui widgets/draw commands until imgui.pop_font is called.
imgui.pop_font()
Unsets the previously pushed font.
imgui.get_default_font_size()
Returns size of the default font for REFramework's UI.
imgui.set_next_window_pos(pos (Vector2f or table), condition, pivot (Vector2f or table))
condition is the ImGuiCond enum.
enum ImGuiCond_
{
    ImGuiCond_None          = 0,        // No condition (always set the variable), same as _Always
    ImGuiCond_Always        = 1 << 0,   // No condition (always set the variable)
    ImGuiCond_Once          = 1 << 1,   // Set the variable once per runtime session (only the first call will succeed)
    ImGuiCond_FirstUseEver  = 1 << 2,   // Set the variable if the object/window has no persistently saved data (no entry in .ini file)
    ImGuiCond_Appearing     = 1 << 3    // Set the variable if the object/window is appearing after being hidden/inactive (or the first time)
};
imgui.set_next_window_size(size (Vector2f or table), condition)
condition is the ImGuiCond enum.
imgui.push_id(id)
id can be an int, const char*, or void*.
imgui.pop_id()
imgui.get_id()
imgui.get_mouse()
Returns a Vector2f corresponding to the user's mouse position in window space.
imgui.progress_bar(progress, size, overlay)
progress is a float between 0 and 1.
size is a Vector2f or a size 2 array.
overlay is a string on top of the progress bar.
local progress = 0.0

uevr.sdk.callbacks.on_frame(function()
    progress = progress + 0.001
    if progress > 1.0 then
        progress = 0.0
    end
end)

uevr.sdk.callbacks.on_draw_ui(function()
    imgui.progress_bar(progress, Vector2f.new(200, 20), string.format("Progress: %.1f%%", progress * 100))
end)
imgui.item_size(pos, size)
imgui.item_add(pos, size)
Adds an item with the specified position and size to the current window.
imgui.draw_list_path_clear()
Clears the current window's draw list path.
imgui.draw_list_path_line_to(pos)
Adds a line to the current window's draw list path given the specified pos
posis aVector2for a size 2 array.
imgui.draw_list_path_stroke(color, closed, thickness)
Strokes the current window's draw list path with the specified color, closed state, and thickness.
coloris an integer color in the form ARGB.closedis a bool.thicknessis a float.
imgui.get_key_index(imgui_key)
Returns the index of the specified imgui_key.
imgui.is_key_down(key)
Returns true if the specified key is currently being held down.
imgui.is_key_pressed(key)
Returns true if the specified key was pressed during the current frame.
imgui.is_key_released(key)
Returns true if the specified key was released during the current frame.
imgui.is_mouse_down(button)
Returns true if the specified mouse button is currently being held down.
imgui.is_mouse_clicked(button)
Returns true if the specified mouse button was clicked during the current frame.
imgui.is_mouse_released(button)
Returns true if the specified mouse button was released during the current frame.
imgui.is_mouse_double_clicked(button)
Returns true if the specified mouse button was double-clicked during the current frame.
imgui.indent(indent_width)
Indents the current line by indent_width pixels.
imgui.unindent(indent_width)
Unindents the current line by indent_width pixels.
imgui.begin_tooltip()
Starts a tooltip window that will be drawn at the current cursor position.
imgui.end_tooltip()
Ends the current tooltip window.
imgui.set_tooltip(text)
Sets the text for the current tooltip window.
imgui.open_popup(str_id, flags)
Opens a popup with the specified str_id and flags.
imgui.begin_popup(str_id, flags)
Begins a new popup with the specified str_id and flags.
imgui.begin_popup_context_item(str_id, flags)
Begins a new popup with the specified str_id and flags, anchored to the last item.
imgui.end_popup()
Ends the current popup window.
imgui.close_current_popup()
Closes the current popup window.
imgui.is_popup_open(str_id)
Returns true if the popup with the specified str_id is open.
imgui.calc_text_size(text)
Calculates and returns the size of the specified text as a Vector2f.
imgui.get_window_size()
Returns the size of the current window as a Vector2f.
imgui.get_window_pos()
Returns the position of the current window as a Vector2f.
imgui.set_next_item_open(is_open, condition)
Sets the open state of the next collapsing header or tree node to is_open based on the specified condition.
imgui.begin_list_box(label, size)
Begins a new list box with the specified label and size.
imgui.end_list_box()
Ends the current list box.
imgui.begin_menu_bar()
Begins a new menu bar.
imgui.end_menu_bar()
Ends the current menu bar.
imgui.begin_main_menu_bar()
Begins the main menu bar.
imgui.end_main_menu_bar()
Ends the main menu bar.
imgui.begin_menu(label, enabled)
Begins a new menu with the specified label. The menu will be disabled if enabled is false.
imgui.end_menu()
Ends the current menu.
imgui.menu_item(label, shortcut, selected, enabled)
Adds a menu item with the specified label, shortcut, selected state, and enabled state.
imgui.get_display_size()
Returns the size of the display as a Vector2f.
imgui.push_item_width(item_width)
Pushes the width of the next item to item_width pixels.
imgui.pop_item_width()
Pops the last item width off the stack.
imgui.set_next_item_width(item_width)
Sets the width of the next item to item_width pixels.
imgui.calc_item_width()
Calculates and returns the current item width.
imgui.push_style_color(style_color, color)
Pushes a new style color onto the style stack.
imgui.pop_style_color(count)
Pops count style colors off the style stack.
imgui.push_style_var(idx, value)
Pushes a new style variable onto the style stack.
imgui.pop_style_var(count)
Pops count style variables off the style stack.
imgui.get_cursor_pos()
Returns the current cursor position as a Vector2f.
imgui.set_cursor_pos(pos)
Sets the current cursor position to pos.
imgui.get_cursor_start_pos()
Returns the initial cursor position as a Vector2f.
imgui.get_cursor_screen_pos()
Returns the current cursor position in screen coordinates as a Vector2f.
imgui.set_cursor_screen_pos(pos)
Sets the current cursor position in screen coordinates to pos.
imgui.set_item_default_focus()
Sets the default focus to the next widget.
Scroll APIs
imgui.get_scroll_x()
Returns the horizontal scroll position.
imgui.get_scroll_y()
Returns the vertical scroll position.
imgui.set_scroll_x(scroll_x)
Sets the horizontal scroll position to scroll_x.
imgui.set_scroll_y(scroll_y)
Sets the vertical scroll position to scroll_y.
imgui.get_scroll_max_x()
Returns the maximum horizontal scroll position.
imgui.get_scroll_max_y()
Returns the maximum vertical scroll position.
imgui.set_scroll_here_x(center_x_ratio)
Centers the horizontal scroll position.
imgui.set_scroll_here_y(center_y_ratio)
Centers the vertical scroll position.
imgui.set_scroll_from_pos_x(local_x, center_x_ratio)
Sets the horizontal scroll position from the specified local_x and center_x_ratio.
imgui.set_scroll_from_pos_y(local_y, center_y_ratio)
Sets the vertical scroll position from the specified local_y and center_y_ratio.
Table API
imgui.begin_table(str_id, column, flags, outer_size, inner_width)
Begins a new table with the specified str_id, column count, flags, outer_size, and inner_width.
str_idis a string.columnis an integer.flagsis an optionalImGuiTableFlagsenum.outer_sizeis aVector2for a size 2 array.inner_widthis an optional float.
imgui.end_table()
Ends the current table.
imgui.table_next_row(row_flags, min_row_height)
Begins a new row in the current table with the specified row_flags and min_row_height.
row_flagsis an optionalImGuiTableRowFlagsenum.min_row_heightis an optional float.
imgui.table_next_column()
Advances to the next column in the current table.
imgui.table_set_column_index(column_index)
Sets the current column index to column_index.
imgui.table_setup_column(label, flags, init_width_or_weight, user_id)
Sets up a column in the current table with the specified label, flags, init_width_or_weight, and user_id.
imgui.table_setup_scroll_freeze(cols, rows)
Sets up a scrolling region in the current table with cols columns and rows rows frozen.
imgui.table_headers_row()
Submits a header row in the current table.
imgui.table_header(label)
Submits a header cell with the specified label in the current table.
imgui.table_get_sort_specs()
Returns the sort specifications for the current table.
imgui.table_get_column_count()
Returns the number of columns in the current table.
imgui.table_get_column_index()
Returns the current column index.
imgui.table_get_row_index()
Returns the current row index.
imgui.table_get_column_name(column)
Returns the name of the specified column in the current table.
imgui.table_get_column_flags(column)
Returns the flags of the specified column in the current table.
imgui.table_set_bg_color(target, color, column)
Sets the background color of the specified target in the current table with the given color and column index.
json
Functions for converting Lua values to/from JSON. Useful for saving configuration setting tables, importing data that users are intended to edit externally, and storing large data structures outside your Lua code.
The indent parameter is an integer specifying the number of spaces to indent with when dumping tables. 0 disables indentation, and -1 also disables line breaks.
Supports Lua's boolean, number, string, and table (see warning below) types. Other types will be converted to nil, stored as JSON nulls. Due to JSON limitations, non-string table keys will be converted to strings (if numbers) or an empty string (if another type), unless the table is a sequence (consecutive integer keys, starting at 1; see the lua manual for more details). Sequences are stored as JSON arrays.
WARNING: Care should be taken when storing non-sequence tables with numeric keys, as those keys will be converted to strings. Extra work must be done to convert those keys back into numbers.
The following are examples of tables that won't change when converted to and back from JSON:
{1, 3, 2, "this is a sequence"}
{foo="bar", baz=42}
{table1={1,2,3}, table2={foo=1,bar=2}}
The following are examples of tables that will change when converted to and back from JSON:
{9, 8, nil, 6, 5} -- Sequence with a "hole", becomes {["1"]=9,["2"]=8,["4"]=6,["5"]=5}
{[0]=0,[1]=1,[2]=2} -- Sequence doesn't start at 1, becomes {["0"]=0,["1"]=1,["2"]=2}
{"foo", "bar", baz=17} -- Becomes {["1"]="foo", ["2"]="bar", baz=17}
local function f() end
{[f]="function key", funcval=f} -- Becomes {[""]="function key"}
Methods
json.load_string(json_str)
Takes a JSON string and turns it into a Lua value (usually a table). Returns nil on error.
json.dump_string(value, [indent])
Takes a Lua value (usually a table) and turns it into a JSON string. Returns an empty string on error. If unspecified, indent will default to -1.
json.load_file(filepath)
Loads a JSON file identified by filepath relative to the UnrealVRMod/GameName/data subdirectory and returns it as a Lua value (usually a table). Returns nil if the file does not exist.
json.dump_file(filepath, value, [indent])
Takes a Lua value (usually a table), and turns it into a JSON file identified as filepath relative to the UnrealVRMod/GameName/data subdirectory. Returns true if the dump was successful, false otherwise. If unspecified, indent will default to 4
fs
This is the filesystem API. this API focuses specifically on the UnrealVRMod/GameName/data subdirectory.
In newer builds of UEVR, the io API is fully supported, but it can only access the UnrealVRMod/GameName/data directory and the stdout/in/err streams. io.popen is also removed.
The io APIs have access to the scripts directory via the $scripts token passed at the start of the filepath string for any of the functions.
Methods
fs.glob(filter)
Returns a table of file paths that match the filter. filter should be a regex string for the files you wish to match.
Example
-- Get my mods JSON files.
local json_files = fs.glob([[my-cool-mod\\.*json]])

-- Iterate over them.
for k, v in ipairs(json_files) do
    -- v will be something like `my-cool-mod\config-file-1.json`
end
fs.read(filename)
Reads filename and returns the data as a string.
fs.write(filename, data)
Writes data to filename. data is a string.